Linux with OpenConnect
Not supported
We only support the Cisco AnyConnect VPN client. Following the steps as described below will result in an unauthenticated connection, which completely defeats the purpose of a VPN connection.
In order to create an authenticated connection, you need to install the AnyConnect client, extract its certificate, and use that certificate in OpenConnect connecton settings.
As the Cisco AnyConnect client is not available for all architectures (for example the Raspberry Pi), on this page we present a way to connect to the MLU VPN using the AnyConnect compatible OpenConnect client. However, as noted above, no responsibility is taken for the correctness of these instructions.
Setup
Dependencies of the OpenConnect client
Make sure that the package "network-manager-openconnect-gnome" is installed on your system. On a RHEL-based system (Fedora, CentOS, RHEL itself) you can install it with the following command:
sudo yum install network-manager-openconnect-gnome
On a Debian-based system (Ubuntu, Linux Mint, Debian itself), use this command:
sudo apt install network-manager-openconnect-gnome
And on SuSE (OpenSuSE, SLES) use:
sudo zypper install network-manager-openconnect-gnome
After installing this package, you will need to log off and on again. If your list of available VPN connection types does not contain the entry "Cisco AnyConnect compatible VPN connection (openconnect)", you will also have to restart your computer.

Mouse pointer on "Wired Connection"
Open your network settings by clicking the network symbol in your system tray. Select your currently active network connection…

Mouse pointer on "LAN settings"
…and click on "LAN settings."

Network settings
A dialog window appears, listing containing your existing network configurations. Click the "+" icon in the lower left to create a new connection. (The black bars in the image are censored IP addresses.)

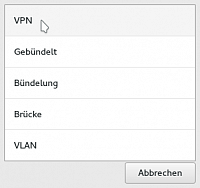
New VPN connection
In the following window, select "VPN"…

New "OpenConnect" connection
and then "Cisco AnyConnect compatible VPN connection (openconnect)."

OpenConnect settings
Name your connection (for example "MLU VPN") and enter "vpn1.uni-halle.de" as the gateway address. Then, click the "Add" button at the bottom right

Network settings with new OpenConnect VPN
Your newly created connection should now show up in the list of network configurations, with the name you gave it. Close the window by pressing the "X" button in the top-right corner.
Connecting to the VPN
Terms of service
The terms of service are legally binding even if they are not shown with the OpenConnect client. Please make sure you accept them prior to using the university VPN service.

Cursor on "VPN disabled"
When you click on the network icon in your system tray now, you should see a new entry "VPN disabled". Click it…

Cursor on "Connect"
…and select "Connect."

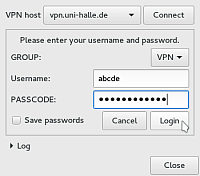
OpenConnect authentication settings
In the window that appears, enter your five-character username in the "Username" filed and the corresponding password in the "PASSCODE" field. Then, click "Login."

VPN connected
Once the connection has been established, the network symbol in the system tray should have changed (in the picture, it has become a network-attached lock symbol). Click the icon—if you see your VPN connection's name in the list, the connection has been successfully established.
Disconnecting from the VPN

VPN connected
Open your VPN settings by clicking the network icon in the system tray, then selecting your VPN connection.

Disconnecting from the VPN
Then, click "Disconnect."


